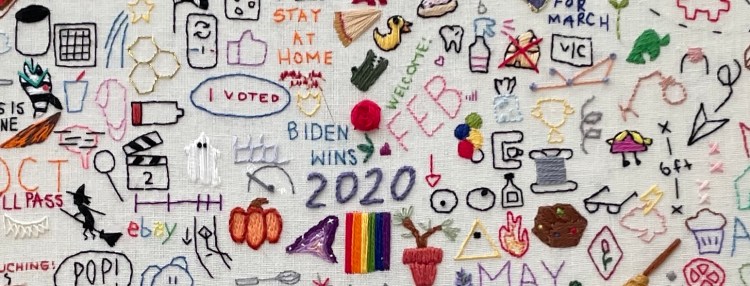
Planning on starting an Embroidery Journal in 2023? Well I have just the thing for you!
I have created a brand new Facebook group for people who have already started an embroidery journal, those that are considering starting one next year, and the lurkers of course.
This group will be packed with information on how to start your own embroidery journal, how to keep yourself motivated throughout the year, and so much more. You’ll be welcome to start discussions about embroidery journals and to share photos and videos of your progress throughout the year. I know I’ll be doing the same. You can look forward to having me as a moderator to keep things fun and light.
I tend to get lots of questions about embroidery journals, but I common one I get is if I can make someone a custom embroidery journal. I don’t blame people for the question, but it’s a big time commitment, it’s 365 icons, each one representing a day of your year. That’s why I put together The Create Your Own Embroidery Journal Guide. But what about those that don’t know how to embroider or just don’t have the time to commit to embroidering an icon a day for a year. Queue a lightbulb moment for myself.
I now have a new listing in my Etsy shop – I will design and embroider a custom mini embroidery journal, just for you (or for your partner, friend, kid, etc) based off of your favourite memories, interests, or anything else that you can come up with.
3 icons5 icons + a title7 icons + a title
The listing has a range of options from 3 to 12 custom icons. However, if you’d like a different amount, we can figure something out.
When I say anything, I mean it:
Anniversaries, Weddings, etc.
Commemorating a trip
One for each year of your child’s life
If you opt for the 12 icons option, you could select an icon to represent every month of your year, it’s like a mini embroidery journal!
Your interests – I did one for myself based off of my favourite video games
and anything else that you can think of, I’m open to stitching most things
How the process works:
You’ll purchase the listing and write out your desired icons in the personalization box. This can be as vague or specific as you like. For example, if you’re getting a piece made based off of a trip that you went on, you could supply me with a list of things that you did each day. I’ll then design icons based off of those days. Or if you’d like a more hands on approach, you could send me a photo or a suggestion of what you’d like each icon to be. You can even request to pull icons straight off of my existing embroidery journals if you see an icon that you like.
After we’ve discussed your icons, I’ll get back to you with a rough sketch of your desired icons.
Once approved, I’ll stitch your design and ship out your piece within a couple of weeks of the previous step.
Customisation Options:
I also have an additional option on each listing to add on a title or header, such as “Our First Year”, “First Christmas”, wedding dates, or anything else that you’d like.
I currently have options for sets of 3, 5, 7, 10, and 12 icons, but I am open to doing a different number of icons than is listed.
If you can’t tell, I’m super excited to get started on some new custom projects, so send your inquiries my way. If you have any questions about the process, please feel free to reach out.
As careful as you might be over the course of a year of stitching on the same piece of fabric, you may start to notice the build up of grime and oils from your hands. Luckily for you, fixing this problem is easier than you expect. I’ve written this guide in order to take you through the steps of cleaning your embroidery journal or other embroidery pieces. If your journal just needs a quick touch up, I also have steps for that process towards the end of this guide.
If you look to where my finger is pointing, you can see a line of grime that is a few inches long.
This happens from time to time and is completely normal.
Supplies List
Your Embroidery Journal or another embroidery piece
A large bowl
Dish soap
Warm water
A towel
Iron & Ironing Board
Cleaning Your Journal Made Easy
First things first, remove your embroidery journal from its hoop. Set your hoop to the side.
Next, grab a large bowl and fill it with warm, soapy water. I typically use about a teaspoon of dish soap for this step.
Take your piece of fabric and place it in the warm, soapy water. If there are any specific spots that you’d like to focus on removing, gently rub at the fabric using your fingers.
Once you’re satisfied with how your embroidery journal is looking, rinse it under a tap until there are no soap bubbles on your fabric. Be careful not to wring out your fabric as this has a chance of causing wrinkles or damaging your stitches.
Grab a towel and place your embroidery journal on it and set it out to dry.
This last step isn’t necessary, but I always love the way it makes my embroidery journal look. So if I’m taking mine out of the hoop anyways, I typically give it a good touch up. So, grab an ironing board and an iron. Give your embroidery journal a quick iron, I tend to avoid ironing my embroidered sections, but that’s up to you.
How Often Should You Do This?
This isn’t something that needs to be done particularly often, but it all depends on how careful you are with your embroidery journal. I tend to make sure that my hands are clean before touching mine and I don’t eat food when handling it. I do recommend cleaning your embroidery journal as soon as you start to notice the build up of dirt and oils on it.
Typically, I clean my journal every three to four months and once at the end of the year.
What if it Doesn’t Need a Full Clean?
I give my embroidery journal a quick touch up about once a week. This is due to the fact that I sketch on my icons before I embroider them by using a water soluble marker.
For this process, it’s a lot less intensive. I don’t even remove my journal from the hoop!
All I do is dab a small amount of water onto the areas that need marker removed. Once I’ve finished doing this, I place my embroidery journal in my windowsill to dry. Typically, it only takes a couple of hours to dry.
Cleaning your embroidery journal doesn’t have to be difficult. Hopefully this post makes it a bit easier on you.
What is an Embroidery Journal?
An Embroidery Journal is a project that lasts over the course of a year. By the end of the year, you’ll have 365 icons that in some way represents every day of your year. This is my third year working on one and I’ve loved every moment. If you’re considering starting your own, then check out the Create Your Own Embroidery Journal Guide.
Everyday, I embroider an icon that in some way or shape represents my day onto my embroidery journal. This could be somewhere I went, something I did throughout the day, or even how I felt. It’s an enjoyable way to end the day and it’s something that I’ve been doing for over two and a half years. However, mistakes do occasionally happen…
2021 was a bit of a tough year for me. I was working quite a stressful job, I had some things arise in my personal life, and then halfway through the year I moved from California to Scotland! Can you spot any of my mistakes in the photo above?
Well, I accidentally duplicated multiple icons throughout the year! One of the reasons that I love working on my embroidery journal is because I’m able to end the year with 365 totally unique icons. This may not seem like such a huge error, but it’s one that can happen when I try to rush to pick out an icon.
But what is my reaction when I realise that I’ve duplicated an icon? Most of the time I let out a laugh and it’s followed by a sigh. I try hard not to do this, but all you can do at the end of the day is laugh it off. It’s bound to happen eventually.
Let’s get into some comparisons of icons from 2021 and what each individual icon of a pair of duplicates represents.
When it comes to the moons, the one on the left represents the night of October 18th, where I had a terrible nights sleep. Funny enough, the moon on the right handside is from, May 11th, when I had a great night’s sleep.
The clothes hangers at the top of the photo is from Jan 21st, that’s a day that I spent a lot of time clearing out my closet. On July 27th, I picked up dry cleaning which is what the icon at the bottom of the photo represents.
These two are quite embarrassing to me, just due to their proximity to each other. The star on top is from March 3rd, which was when I found out that I was featured in an article. The second star is from May 10th, when I played Animal Crossing with my best friend.
Now we have a bit of a similarity, both of these cinnamon sticks represent something that I baked. On August 19th, my aunt and I made cinnamon rolls. While on December 18th, that’s the cinnamon stick at the top of the photo, I baked snickerdoodles, which it turns out is quite the American treat.
I feel seriously humbled after doing this
I’m a massive pancake fan and the fact that I only embroidered pancakes twice is a surprise to me. The pancake to the right is from feb 28th. On that day, I made pancakes for breakfast. The pretty set of pancakes on the left is from December 24th when I went out to breakfast with some friends from work.
Oh how the first half of 2021 was filled with doctors appointments. So I ended up with a couple of stethoscopes. On April 20th, the pink stethoscope, I took a family member to a doctors appointment. The set on the left was from June 18th when I had my own doctors appointment.
At the end of the day, all you can do is laugh as we all make mistakes. I really try not to put too much pressure on myself. If I notice that an icon is a duplicate after I’ve already embroidered it, I just leave it be.
As for 2022, I haven’t spotted any duplicate icons, yet. Sometimes it just takes a few months for me to actually register that I’ve made an error on my part. If you spot any, I’d love to know!
Everyday, I embroider an icon that in some shape or form represents my day onto my embroidery journal. This icon can represent something that I did, somewhere I went, or even how I was feeling that day. Each year, I start my journal on January 1st and stitch my last icon would on December 31st. However, there are a multitude of other ways in which you can get creative with your embroidery journal. Let me take you through some ideas that I’ve collated
A New Job
Want to know something interesting? This is actually the reason I started my 2020 embroidery journal in the first place! I started a brand new job as a Housekeeping Manager in Training in a hotel on January 3rd, 2020 and figured it would be interesting to track my progression in my new job throughout my embroidery journal. That is, until I was furloughed three months into the job, then it became more of a record of the pandemic from my perspective. It was still an interesting concept to consider though and for the first three months of 2020, you can see that reflected.
A Notable Birthday
There is always have the option of starting and finishing on a day other than January 1st every year. Say you’re turning 30 this year, you could potentially start on your birthday! Your first stitch of the year would be on your birthday and throughout the year, you can stitch a daily icon correlating to your day. By the end of the year, you’d have an entire picture of how your 30th year went.
Exciting Life Moments
Getting married? You have the opportunity to track your engagement leading up to your wedding day. Stitch the important moments like cake tasting, picking out flowers, the bachelor and bachelorette parties, and finish on your wedding day. Once completed, you’ll have a beautiful piece of art that showcases your love story with your spouse.
Similarly, if you are expecting a new addition to the family, you could stitch an icon per day based on how you are feeling and how you’ve prepared for the arrival.
Or how about a life changing move? Personally, I used this technique when it came to making the move to Scotland. I knew it was something that I’d be able to put emphasis on when I was buying coats, purchasing the plane ticket, had found a flatmate, etc. I was able to get quite creative with my icons and was so excited when I was able to finally stitch the Union Jack!
First year of Marriage and Wedding Anniversaries
After getting married, you can track your first year of marriage via an embroidery journal. You can start on your wedding day (retroactively of course) and continue to stitch an icon a day based off of life with your new spouse.
Similarly, after your first anniversary, you could either decide to continue the trend of creating a journal a year based on your years of marriage or you could hold off and only stitch the ‘big’ anniversaries such as year 5, 10, 25, etc. If done over a few years, it could make for a beautiful and creative view of your relationship.
Retirement
When my grandfather retired from his career is the furniture sales business, he had new business cards printed that listed out all of the new things he wanted to accomplish with his newfound time. Things like playing the guitar and travelling with my grandmother. I always found that to be a lovely sentiment. Similarly, you could embroider all of the things you accomplish or plan to do, once retired.
Only stitch the big events
Taking on a daily embroidery journal is quite a lot of work and not everyone has the time to devote an hour or two a week to embroidery. Instead, you have the option of only stitching the ‘big events’ of the month. Instead of stitching 28-31 icons, you could select 5-10 icons per month and focus on those events instead. With this method, you could allow for more effort and detail to be put into each individual icon.
There are plenty of ways you could create a unique and creative embroidery journal based off of your life. However, any embroidery journal that you create will already be completely unique to your life and unlike any other out there. All that matters is that you enjoy the journey in creating it.
On January 1st 2020, I embroidered my first icon onto my embroidery journal. Giving it careful consideration, I chose a rose. This represented the rose parade, which I had watched on TV that morning. Growing up, I would attend the rose parade with my grandparents, rain or shine. I have fond memories from those early mornings with my family. From my very first icon, I knew that I would always be considering my next icon.
Looking to find out more about what an embroidery journal is? Essentially, everyday I add an icon to my embroidery hoop. This icon will in some way represent my day. It could be something I ate, watched on TV, did at work, or even how I was feeling that day. I usually embroider the event that stands out the most, the most memorable thing. At the end of the year, the hoop will be filled with 365 small icons which together, summarises my year. For more information, check out the Create Your Own Embroidery Journal Guide.
Over the past two and a half years, my three embroidery journals have had many different things embroidered. Three different jobs, a bone infection that nearly cost me a toe, an international move, a blossoming relationship, amongst other memorable moments.
2020
Originally, I started my first embroidery journal as a way to document my first year in a new job as a Housekeeping and Front Desk Manager in Training at a hotel in Irvine, California. Clearly, I had no idea what the year would have in store for me.
I loved my job, I started off in housekeeping and developed a passion that I wasn’t aware I held for the housekeeping department of a hotel. I lasted three months in my role before being furloughed for a month. One month became three, three quickly became six. Since I wasn’t working, I was able to focus more on my hobbies, like my baking and embroidery. So I started to document my embroidery journal online, which turned into The Stir-Crazy Crafter.
When I wasn’t stitching, I was roller skating, baking, having my car nearly combust on me, and thinking about the future. I eventually decided that I wanted to move to Scotland when I had the chance.
In need of work, I took up a temporary job as a security guard at a hotel in Santa Barbara, California. It was definitely an eye opening experience for my career development. Towards the end of my stint at that property, I ended up having some pain in one of my feet. It was treated by a doctor as a small infection, but it didn’t seem to improve. When I finally returned to Huntington Beach, I saw my doctor who wanted to try a different course of treatment. She recommended that I see an infectious disease doctor and was quickly diagnosed with a bone infection. Three days later, I had a PICC line inserted into my arm and I started a month long, thrice daily treatment of fluid antibiotics. It was honestly a terrible experience, but it did the trick.
Eventually, in October of 2020, I returned to the hotel that I had started at back in January. With the ongoing pandemic. My job changed – I was now expected to oversee the front desk, housekeeping, and a coffee shop at the same time while having a leadership team half the size of what it had been pre-pandemic. Towards the end of October, a fire broke out in Irvine. It caused mass evacuations and with the evacuation zone ending near the hotel, it caused people to flock to the hotel. It was one of the longest and most stressful shifts I have ever worked.
2021
In March, I received some upsetting news and chose to put in my notice at the work. It was a tough decision, but I needed to do it. It also gave me the time to plan for my upcoming move to Scotland.
In June, my best friend moved from California to Tennessee. I chose to visit her and her husband a month later. We went hiking, saw the local sights, ate loads of great food, and had an overall great time. Alas, I knew that I’d be moving two weeks later, so once home, I threw myself into getting packed and finalizing all of the last remaining details.
Finally, on August 6th, I flew from California to London, which ended my time as a resident of California. After landing in London, I spent time visiting family and catching up on lost time. I ended up living in Telford, a town near Birmingham, with my aunt and her dogs. While there, I focused on finding a job and a flat in Glasgow, which is where I intended on living. While in Telford, I also assisted my aunt in setting up a vegan home baking business, Morag’s Bakes. With having so much freetime, I started to experiment on TikTok, which somehow caused multiple videos to go viral. In turn, I ended up having a couple of articles written about not only my embroidery journals, but also about myself.
In late August, I visited Edinburgh and Glasgow for a few days each, mainly to solidify my decision on moving to Glasgow. Though while I stayed in Glasgow, I ended up meeting the person that would end up becoming my boyfriend, giving me one more reason to hurry up and get a job
In October, I accepted a job offer to work as a front desk supervisor at a hotel and by the end of the month, I had moved in with my lovely flatmate in Glasgow. Throughout the rest of the year, I spent my time working at the hotel, exploring Scotland, spending time with my boyfriend, and getting to know my flatmate and coworkers.
2022
Growing up on the beaches of California, I never really had the chance to experience a real winter. Well that changed when I moved to Glasgow! I was able to enjoy so much more rain than I was used to having in the perpetual droughts that exist in California, not to mention the few snow days that Glasgow had this year.
Working as a front desk supervisor meant that I had to pull my weight in other ways, including working overnight shifts at the front desk when we were understaffed. Each night, I’d make it through the shift okay, but by the time 7AM rolled around, I’d wander the streets of city centre in need of a vegan sausage roll from Greggs. I kid you not, every time.
In late March, I flew back to California for two weeks for my older brother’s wedding. I was able to catch up with friends and family, sunbathe at the beach, and cuddle up with my cats. But by the time the trip concluded, I was aching to go back home to Glasgow.
In May, my boyfriend and I celebrated our birthdays in Oban for a couple of nights. We enjoyed a seaside hike on the island of Kerrera, ate at a few restaurants, and enjoyed our time together.
Now that we’re nearly caught up, in mid-June I left my job at the hotel. I’ve decided to focus full time on The Stir-Crazy Crafter and try to give it the shot it deserves. I’m so excited for what the future has in store.
Now that I’m on my third embroidery journal, I can’t imagine myself ever not working on one. It has become so routine for me to find the time every few days to update my journal. I get asked every now and then how I’ve managed to keep up with my journal for three years despite working a few demanding jobs. The fact is that I’m the type of person who once they starts something, they don’t give it up easily – I’m that stubborn.
2021 has been a lot of things. It’s been exhausting, bittersweet, and even gloomy, but it’s also been filled with joy, nervous excitement, and exhilaration. I’ve experienced so much throughout 2021 and my journal has captured it all. It’s seen multiple jobs, an international move, a new relationship, and so much more.
My completed 2021 Embroidery Journal
My journal, now that it is completed, holds 365 icons representing the 365 days of 2021. It covers a variety of things, usually the most memorable part of my day. This could be something positive or negative. On a normal day, I may cover something I ate, somewhere I went, how I was feeling, something I read or watched, etc. If you’re interested in finding out more about embroidery journals, I have written a series of posts.
january
While my year has ended on a high note, it started out a bit tough. I was working in a demanding job, and while I was enjoying it, I wasn’t left with much freetime to do anything other than work and recover from working.
The majority of my January is filled with icons representing my time at work: guest interactions, cleaning, mostly just hotel job duties. It does have a few fun stories present: the handcuffs and “can I have a ride” being two of them.
february
Sorry to disappoint, but February carried on similarly to January. The majority of what I stitched was representative to what was going on at work. I fit in a couple of meals out with friends and I started allowing myself to read in my freetime, which carried on throughout 2021.
Unfortunately, I really don’t have any decent photos from the first couple of months of the year.
March 2021
march
In March I started to carve out more time for myself and start seriously planning for my upcoming international move. I knew that leaving behind my friends, family, and cats was going to be tough – so I became more intentional about spending time with my loved ones. This was the month that I notified the management team at my hotel that I intended on leaving my job in a few months. I even ended up getting the first round of the Moderna vaccine in March.
Things were starting to fall into place and I was getting excited. However, in late March I received some bad news, which ended up shifting things.
April 2021
april
With the changes that happened in my life, I left my job earlier than I anticipated, which was at the end of April. It was a tough decision, leaving my job – but I knew it would have happened eventually with my move. However, because of this, I was able to spend much more time that I had expected with my family and friends. I was also able to focus on my quickly approaching move to the U.K.
Also, I found out that eating your feelings is real and I did a TON of that throughout April – it was an overwhelming month, not only for myself, but also for my family.
May 2021
may
Oh, May, I always love May. It was the month of not only my 26th birthday, but also my younger brothers 21st.
My best friend and younger brother teamed up to give me a joint gift for my birthday of a Switch and Animal Crossing: New Horizons. So I spent entirely way too much time playing ACNH. Despite this, I found the time to launch The Stir-Crazy Crafter website! I spent so much time working on it and I’m still so proud to have made that leap.
This is the month where despite everything that was going on in my life, I went for it and purchased my plane ticket for my move. My ticket was for early August, which seemed like enough time to get everything together and organized for my move.
June 2021
june
Remember how I said this year was bittersweet? Well that was because of this month. While I was intending on leaving California in August, my best friend of 14 years moved in June with her husband to Tennessee. Before they left, we were able to spend quite a lot of time together, with minimal tears. We’ve always talked about visiting The Living Desert together, well we finally made the trip, the week before she moved. It was worth getting heatstroke (twice!).
June is also the month that I allowed myself to fully dive into reading. You can see icons representing several of the books that I read throughout the month: The 7 Husbands of Evelyn Hugo, Malibu Rising, Turtles All The Way Down.
July 2021
july
July was deemed the month of stress and french knots.
My flight was booked for August 6th, and I had five weeks left to prep for my move. I was in and out of doctors offices and the dentist office making sure that I was fully healthy. Which I was, for the most part.
I saw a new dentist who was under the impression that I may have a screw loose in my jaw (from a previous dental surgery as a teenager). After a week of worries and a mobile CT Scan of my jaw, it was deemed that nothing was actually wrong with my jaw, luckily.
I took the time in July to fly to Tennessee and was able to explore the area that my best friend and her husband moved to. I enjoyed Tennessee a lot more than I had expected and can’t wait to return.
August 2021
august
In the weeks leading up to my move, I hit multiple roadblocks that made me think, “this is it, this is the thing that will stop me from moving”. Despite this, on August 6th, I got on a plane, headed for London.
I am so lucky to have so much family living in England. Because of this, I was able to spend a few days exploring London. I then traveled to a town outside of London to visit my Grandad and his wife, who I hadn’t seen in about three years.
After saying my goodbyes, I went up to Telford, where I stayed with my aunt and her dogs while I was looking for jobs and flats in Scotland.
September 2021
september
In September I stayed in Telford for the majority of the month. I did however, take a week long, impromptu, trip up to Edinburgh and Glasgow in order to explore both cities. I had always intended on living in Glasgow, but I wanted to give Edinburgh a fair shot. While in Glasgow, I actually ended up meeting a sweet guy, so I’d say it was well worth the trip.
I spent the rest of the month applying to jobs, doing virtual job interviews, reading, going on doggie walks with my aunt, and assisting her in launching her vegan home baking business, Morag’s Bakes.
I might have even flown back up to Edinburgh for a first date with that guy I had met earlier in the month…
October 2021
october
October is where things really came together. After about a month and a half of trying to get a flat or a job in Glasgow, I managed to secure both within 5 days of each other. I would be moving in late October, and starting my job in a hotel in Mid-November.
With the two main things that had been worrying me taken care of, I was able to focus on some more enjoyable things, like my embroidery and spending time with my family. Just for fun, I started making videos on tiktok. I posted a video of the supplies needed for creating an embroidery journal and to everyone’s surprise, overnight it gained 1.2 million views. From there, Better Home & Gardens wrote an article about my journal.
At the end of the month, I finally moved up to Glasgow, just in time to experience my first Autumn, ever.
November 2021
november
When I moved from Telford to Glasgow, I mailed off a couple of my suitcases using a courier service. One turned up at my flat, the other one never did. So I spent the first week and a half of November in my flat, waiting for my missing suitcase to appear. However, I was able to spend quite a bit of time with my new flatmate and really get to know her during this time.
In mid-November I started my new job in a hotel. I figured that I would enjoy it, but I guess I hadn’t realized just how much I had missed the chaos of working in a hotel. I’m a part of a great team and I already have so many fun guest stories to share.
With living in Glasgow, I was also able to spend more time with that sweet guy – going on walks, coffee dates, and baking up a storm: cookies, brownies, and even red velvet cupcakes together.
December 2021
december
In December, I found myself getting into the rhythm of my new job and getting to know my coworkers – they’re a great bunch. I was also able to spend loads of time getting to know my flatmate and I put my bus pass to the test by using it to explore my new city.
My boyfriend and I went up to Edinburgh to visit the Christmas Market for a night. It was raining the entire time, but we made the most of it by enjoying hot chocolate and mulled wine, along with some good conversations.
While this was the first Christmas I spent away from my family, I was so lucky enough to have my flatmate chose to spend the morning with me.
As you may know, on December 31st, I completed my journal. I’ve been asked what my last stitch was – it’s mold. I spent the last morning of the year cleaning mold off of the windowsills in my flat. What a way to end 2021.
Last June, after years of thinking that I wanted to live in England, I changed course and decided that I actually wanted to live in Glasgow. I cannot stress enough, how happy I am to have made this decision. I keep saying that it’s one of my best decisions, and I truly believe that. Who knows, maybe if I had ended up in England, I still could have been this happy. I was worried when I moved about finding a job, finding a flat, creating a support system, and so many other things that I just tried not to let get to me. Eventually though, everything just worked itself out. I ended up with a job that I enjoy, a lovely flat, a great flatmate, and even a wonderful boyfriend (who saw that coming? I for sure didn’t).
If you’re considering creating an embroidery journal in 2022 – do it. One of my favourite things is to glance at my journal and recall all of the great things that have happened this year. While the first few months of this year were tough on myself and my family, I’m able to see just how much things have improved throughout the rest of the year.
Did you enjoy this post? Then check out my Instagram and TikTok – I frequently post embroidery journal updates as well as photos of my other WIP pieces.
In March I wrote a piece similar to this, but for my 2020 embroidery journal. If you are interested, then check it out here: A Stitch in Time.
Taking on an embroidery journal is a bit daunting, but it is truly such an enjoyable and relaxing project once you get into it. One of the biggest reasons that I’ve seen people oppose starting their own embroidery journal, is because they feel that they don’t live an exciting enough life or may just have trouble coming up with an icon for 365 days of the year. I promise you that it is quite a lot of work, but once you get past the challenge of coming up with a unique icon everyday, you’ll fall in love with the project.
In order to make taking on an embroidery journal a little bit easier, I’ve put together a guide on how I decide on what to stitch each day, whether I have an idea of what direction I’d like to go in or if I am in need of a bit of inspiration.
I don’t view myself as being an artsy, creative person. I do however design the majority of my icons myself and it’s something that I take pride in. If you decide to take this approach, I really recommend having a sheet of paper nearby so you can do a couple of quick drafts of what you want your icon to look like. On the days where I may be having trouble coming up with an icon, I will use Google images in order to get a reference but still aim to make an original icon.
Sizing
My icons vary in size greatly from one to the next. My larger icons are around 2×2 cm and I struggled to find many icons bigger than that. On the other hand, my smallest icons are around .05x.05 cm. A healthy journal will have a variety of sized icons. As said in a previous post on spacing out your icons, I like to start off with some large icons at the beginning of the month and fill in the gaps with smaller icons.
A Starting Point
I usually try to stitch the biggest event of the day, or something out of the ordinary. For example, say I went to the doctor’s office, I might embroider a stethoscope, a shot, or a thermometer. Maybe I baked chocolate chip cookies, I may embroider a cookie, a whisk, an apron, etc. A bit more unusual, maybe I had an interview for a job. In this case I might embroider the Zoom logo, a microphone, a brief case, or something else along those lines. There are so many ways that you can interpret a single event, it’s up to you to figure out what the best course of action is for you.
I have several categories of types of icons that I tend to stitch. These vary widely and cover a large range of events. As most things go, this is not a complete list – there are so many different things that you could add to your journal that I’ve never even thought of.
Food – Honestly, if you take a quick glance at my journal, I’m certain that one of the first things you’ll notice is the sheer amount of stitches relating to food. It’s a great thing to gravitate towards when you’re unsure of what to stitch.
Phrases – I personally try not to use too many words in my journal, but sometimes they are the best thing to stitch on a given day. The trick here is aiming not to make your writing too large or else it might take up a bit too much space. I’ll normally sketch out the word or phrase I’m aiming to stitch and try to condense it even more as I stitch.
Current Events – I typically keep my journal focused on what I personally have experienced throughout the year. Occasionally, I will stitch something related to a current event, this is quite rare for me though. However, this is a project that you can mold to you and your experiences. If you want to only stitch current events, you could do that too!
Rest days – On slow days, I usually stitch something that I watched, something I read, something that I ate, or even something I saw (like a squirrel in the backyard).
Monotonous work days – These are some of the toughest ones to figure out! I like to do something along the lines of a gear, a briefcase, a stick figure running around, etc. My previous position was as a housekeeping manager, so my stitches are very much related to work: mop and bucket, a broom, a broken house, guest interactions, I think you get the vibe. If anything at all unique happened, that’s typically what I would aim to stitch.
Something that persists for multiple days – For something like this, I tend to break it up into multiple parts – For example, last Summer I had some treatment for a medical issue that essentially became my life for a couple of months. I ended up breaking up what was going on and embroidering individual things – An X-Ray, an IV drip, a pill bottle, so on and so forth. If you look back on my 2020 journal, you can pretty quickly spot that period due to a collection of medical based icons. I also managed to group all of these stitches together so you could easily see that there was a theme.
Media – Say that nothing else unique happens on a specific day, but I do manage to finish a book or a TV show. I may go ahead and stitch an icon representing that piece of media! Like a TV show, film, or book that I consumed.
November2024 ADDITION: hello, hello, I’m now designing icons which are available for purchase in my Etsy shop. I currently have OVER 500 icons available for purchase! You can find digital downloads and complete kits on Etsy!
Helpful Hints
If you’re having a tough time coming up with an icon to stitch, open google and search “______ icon”, so maybe “medical icon” or “Halloween icon” or even “cleaning icon”. You can be as simple or as complex as you like, 9 times out of 10 this works like a charm to bring up suitable results. This is a good way to strike inspiration when you’re stuck on what to stitch for a certain day.
Personally, I don’t like to repeat icons. It does occasionally happen on accident, but this is a rule I try to follow. For yourself though, you may feel the need to repeat an icon multiple times! It’s up to you, this is your project and you can set the rules as you deem fit.
While these are just some ideas for icons that are a great starting off point, there are so many more things you could stitch on your journal.
If you plan on starting your own embroidery journal, please tag me in your photos! I love to see how they come along throughout the year.
Have you ever looked at my embroidery journal and been confused by how how at the end of the month I can perfectly squeeze in an icon for every day? Well, with this post I’ll be showing you how I accomplish this and how you can do the same. I get it, you’re worried that you might make them all too large and run out of space. It can be overwhelming to start with, but over time you’ll improve your skills on balancing out the sizes of your icons. You’ll realize that it’s okay to have some larger icons alongside some tiny ones.
You can see that I like to have quite a variety of sizes when it comes to my icons. In September you can see a large couch, laptop, vacuum, and a book. All of these take up quite a lot of space. Although, you can also see some smaller icons that squeeze into gaps: the pig snout, the not allowed sign, and the question mark. So let’s dig into the method behind the madness.
So what is an embroidery journal? Essentially, every day of the year you stitch an icon on your journal. This can cover what you did that day, something you ate, how you felt, or even something you watched on TV! Throughout the year, you’ll watch as all of your hard work pays off and your hoop begins to fill.
This may seem like an obvious thing to do, but I’ve absolutely had months where I forgot to do this and I was left fitting my month where I had leftover space! So I definitely recommend doing this when you are doing your first update of the month.
Start out the month with some larger than average icons
This may sound a bit counterintuitive, but I sometimes like to start out the month by making my icons a bit bigger than average. I enjoy having a variety of sizes when it comes to my stitches for each month, and this provides an easy way to manage this.
Notice that I have made the first six icons of September a bit larger than the average sized icon
Batch out your updates
You may be tempted to do an update a day, if you can keep up with that, then that’s wonderful! Personally, I could never manage to do that. So I update in batches of around 3 to 5 days at a time. It’s just a bit easier for me to keep up with my journal without overwhelming myself.
Looking at this photo, you can see how I go about updating my journal in batches
Taking inventory of remaining space towards the end of the month.
When I started my 2020 journal, I kept finding that at the end of the month it was a struggle to fit in those last 2-3 icons. After a few months of this, I started thinking ahead and was able to bypass this entirely. Usually when I have about 5-7 days worth of days left to stitch, I’ll take inventory of how much space I have left and think about how I can fit in my last few icons of the month.
Don’t overthink it
This definitely will not be what you want to hear, but try not to overthink it. If you worry too much about how big or how small to make your icons, it’s probably going to put you off of updating your journal at all. At the end of the day, just have fun with your craft.
Something that I get questions about quite often is how do I segment my embroidery journal. If you take a quick glimpse at my journal, you may not notice that there is a dividing point between where one month ends and another starts. Looking at the comparison below, you can get a better idea of how my journal is actually divided. Once you understand how an embroidery journal is segmented, it makes maintaining one a lot simpler.
For those that are just now discovering what an embroidery journal is for the first time, let me break it down for you. Once a day, I add an icon to my embroidery journal. This icon will be in some shape or form related to my day. It may be something I did, how I was feeling, somewhere I went, or even something I ate that day. Basically, it can be anything I want it to be as long as it relates to my day.
Anyways, back to the topic at hand. Segmenting your journal month by month. Dividing my journal like a pie chart is how I’ve set up my embroidery journal over the past two years. While there are other ways you can go about it, this is my favourite way I’ve found.
Supplies List:
Embroidery hoops – I prefer a 12 inch hoop, but you can also use a smaller sized hoop. You’ll also need a smaller hoop for a portion of this guide – a 5 inch hoop should do.
Square of fabric – I use 100% cotton, but the measurements completely depends on the size of your hoop. I would suggest having your fabric square being at least 4 inches larger than your hoop. If your hoop is a 12 inch hoop, I would suggest your fabric square being at least 16″x16″ large. This will give you 2 inches leeway on either side of your hoop.
Template – printed out or displayed on a tablet or laptop screen. I’ve designed a 2023 template. I’ll be using my laptop for the below method.
A water soluble marker
Transparent ruler
Embroidery floss
Embroidery needle
Step 1
Start by taking your piece of fabric and folding it into quarters. Unfold your fabric and locate the center point. Mark it with your water soluble pen. This will become the center of your journal.
Step 2
Unfold your piece of fabric and put it within a smaller hoop, I’m using a 5 inch hoop. Then put the upside down hoop over your printed out 12 piece pie chart template or tablet/laptop screen. I will be demonstrating the laptop method.
For my demonstration, I have put my fabric in a taut 5 inch hoop. Then I have placed it on top of the screen of my laptop on full brightness.
Using your water soluble pen, trace an inch to two inches across the center of the pie chart on your fabric.
Step 3
Place your fabric in your 12 inch hoop. Make your fabric as taut as you possibly can. Lay your ruler on top of your fabric, lining it up with the lines you drew in the previous step.
Using your water soluble pen, extend your lines from one edge of the hoop to the other.
Each of these 12 segments will represent one month of your year.
Step 4
Write out 2022 in the center of your hoop. I usually freehand this.
Once you’re ready, you can embroider over your handwriting.
These are the steps that I find necessary to set up an embroidery journal. However, I do have a couple of extra things that I do to my journal. There are my no means necessary, but they are helpful over the course of the year.
Optional Step 5
Position your fabric within your embroidery hoop until you are happy with how taut it is. Finding the edges of each line, create a small stitch or french knot along the edges of your hoop where each month should end.
There are loads of ways to protect the edges of your fabric over the course of the year. Personally, I like to stitch the edges of my journal using a blanket stitch. I find that this helps protect your piece of fabric from fraying, which can become an absolute nuisance down the line.
That’s it! With these few steps, you’ll have your embroidery journal set up and ready to go for 2022! You can of course organize your journal in whatever way you prefer for yourself, but this is how I’ve set mine up over the past two years and it’s worked quite well.
If you found this post interesting, then don’t forget to check out the rest of my series on how to create your own embroidery journal. You can also find an all in one in-depth embroidery journal guide on Etsy. I also frequently share tips & tricks on my Instagram and TikTok on how to maintain your own embroidery journal. If you’re lucky, you might even get to see a sneak peek of any current pieces that I’m working on!